Assembly instructions
1. ASSEMBLY OF THE DRIVE SYSTEM:
Open the box and lay out all the parts. Carefully remove the foil from around the frame of the portable system.
Loosen the two bolts of the top right hinge using socket spanner No. 13.
Take adapter A and place it on the top right hinge and fasten with the enclosed M8 - 70 mm hexagon socket screw with spring washer. Place the cover caps in the hexagonal bolt when it is correctly positioned and tightened after installation of the carrier system.
Remove the bumper block at the bottom left using hexagonal key 6.
Take a straight slat and connect the left side of the round hole at the top with the left side of the hole at the bottom. Mark this with a pen. Do the same with the right side of the holes. Saw away the section between the top round hole and the bottom hole on the marked lines.
Position the template in such a way that the holes already visible correspond to the template.
Drill two holes with a diameter of 20 mm at the indicated locations.
Remove the 2 bolts of the hinge with socket spanner no. 13. These can be dropped and removed.
Place adapter B in the free space. This can be done by tilting the adapter into the recess.
Fasten with the enclosed M8 - 40 mm hexagonal bolt with spring washer.
Take a straight slat and place it on the outside of the upper and lower adapters, making sure they are both in a straight line.
Repeat these actions on the left-hand side, fitting adapter C in the same way.
Adapter C has slotted holes at the attachment points. This allows the adapter to be slid to the left or right. In this way, the optimum position can be chosen by closing the Van 'n Bike carrier system. When the closure is optimal, the fastening bolts can be tightened by using the bolts with the enclosed serrated washers and washers.
Attach the portable system to the adapters A and B using the supplied hinge shafts.
Make sure that adapter B (at the bottom right) also supports the frame. If this is not the case, loosen the adapter slightly and slide it up so that it also supports the frame.
Mount the gas spring at the top right to the attachment points provided between adapter A and the frame of the portable system.
Mount the gas spring with the thick part on the side of the frame and the thin part on the side of the fixed hinge. On the latter side there is a quick-release fastener so that the gas spring can be easily released when removing the support system.
2. ELECTRICITY
Insert the rubber grommet into the 20 mm lower bore on the right-hand side of the bumper.
Pass the electric wire with the side without a plug through this rubber grommet and guide the wire behind the bumper to the provided plug of the tow bar installation.
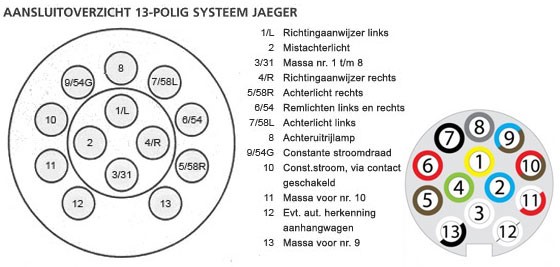
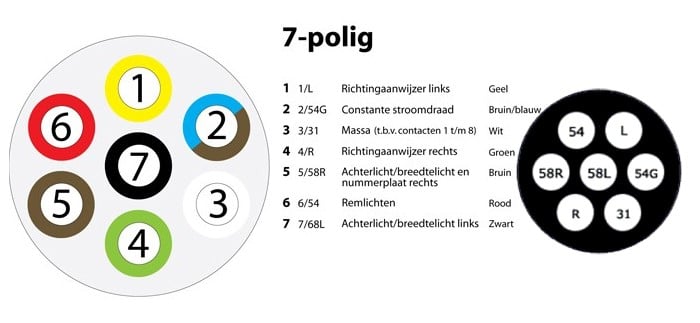
Fit the supplied plug to this end of the wire according to the diagram provided.
Attach the included clamp to the bottom of the back of the portable system using two screws. The holes for these two screws are provided in the frame of the portable system.
Attach the mating plug to the clamp on the underside of the frame of the carrier system so that the plug is firmly inserted and can be removed for coupling to the plug on your bicycle rack.
3. FINISHING
Place the 3 plastic sealing rings on the remaining drilled hole on the right (in the area of adapter B) and the 2 drilled holes on the left (in the area of adapter C).
Attach the supplied ball bolt and tighten it.
Check the assembly again and check all fastenings.
Your Van 'n Bike carrying system is now ready for use.
ALWAYS PLACE THE DIAL (STAR DIAL) IN THE INTENDED POSITION AND TIGHTEN IT BEFORE DRIVING!
IF THE PORTABLE SYSTEM IS ATTACHED TO YOUR VEHICLE, NEVER OPEN THE RIGHT REAR DOOR MORE THAN 90° IN ORDER TO AVOID DAMAGE TO YOUR VEHICLE!
Wiring diagram for 7-pin connector
Wiring diagram for JEAGER 13-pole plug